RSpec error – Host header or origin header is specified and is not whitelisted or localhost.

I encountered the following head-scratcher when trying to run the following RSpec test on MacOs:

➜ bundle exec rspec ./spec/features/some_spec.rb:12
...

Capybara starting Puma…
Version 4.3.8 , codename: Mysterious Traveller
Min threads: 0, max threads: 4
Listening on tcp://127.0.0.1:63422
...

Selenium::WebDriver::Error::WebDriverError:
unexpected response, code=500, content-type="text/html"
Host header or origin header is specified and is not whitelisted or localhost.


After much fruitless poking around in ./spec/rails_helper.rb, I checked my /etc/hosts file and realised I had mapped 127.0.0.1 to a custom name. I updated /etc/hosts to include only the following lines:

127.0.0.1 localhost
0.0.0.0 my.localdev


And hey presto, Selenium would now run the rest of my (still failing) tests.

As an aside, I tried passing the options '--headless', '--disable-web-security', '-–allow-file-access-from-files', '--allowed-origins=*‘ to Capybara in ./spec/rails_helper.rb, and none seemed to have any effect.

Rails HTTPs error on localhost – getaddrinfo SocketError

I recently began developing a Rails Plugin gem, and running the dummy app locally using HTTP worked flawlessly out of the box. However, when it came time to test HTTPS, I encountered the following error:

➜ rails s -b "ssl://0.0.0.0:3000?key=config/cert.key&cert=config/cert.crt"
=> Booting WEBrick
=> Rails 5.2.6 application starting in development on http://ssl://0.0.0.0:3000?key=config/cert.key&cert=config/cert.crt:3000
=> Run rails server -h for more startup options
INFO WEBrick 1.4.4
`getaddrinfo': getaddrinfo: nodename nor servname provided, or not known (SocketError)

This was puzzling at first as I had other apps running fine using HTTPS. After closer inspection I discovered the other apps were running under the Puma webserver, while my gem had defaulted to using WEBrick.

Solution

The solution was to find the latest version of Puma and add it to my gem:

➜ gem search puma
*** REMOTE GEMS ***
...
puma (5.5.2 ruby java java, 5.4.0, 4.3.10)
...

edit ./Gemfile:
...
gem "puma", "5.5.2"
...

Install the gem:

➜ bundle install
...
Installing puma 5.5.2 with native extensions
...

The Rails app then booted into HTTPs successfully under Puma:

➜ rails s -b "ssl://0.0.0.0:3000?key=config/cert.key&cert=config/cert.crt"
=> Booting Puma
...
Listening on ssl://0.0.0.0:3000?key=config/cert.key&cert=config/cert.crt


Error when installing Rubocop globally on Macos using rbenv and homebrew

To use the Rubocop gem with VSCode to assist with code linting, it’s sometimes desirable to have Rubocop installed at the system level. I recently ran into a permissions problem when using the homebrew version of Ruby to install Rubocop, and this was the solution:

➜ gem install rubocop
ERROR: While executing gem … (Gem::FilePermissionError)
You don’t have write permissions for the /Library/Ruby/Gems/2.6.0 directory.
➜ rbenv install -l
➜ rbenv install 3.0.2
➜ rbenv global 3.0.2
➜ ruby --version

ruby 3.0.2p107 (2021-07-07 revision 0db68f0233) [x86_64-darwin20]
➜ gem install rubocop

(long pause)

Done installing documentation for unicode-display_width, ruby-progressbar, ast, parser, rubocop-ast, regexp_parser, rainbow, parallel, rubocop after 24 seconds
9 gems installed

Rails: Error installing gem mysql2 on MacOs

When installing gems on a new project under MacOs using bundler, I encountered the following error for MySql:

Installing mysql2 0.5.2 with native extensions
Gem::Ext::BuildError: ERROR: Failed to build gem native extension.

linking shared-object mysql2/mysql2.bundle
ld: library not found for -lssl
clang: error: linker command failed with exit code 1 (use -v to see invocation)
make: *** [mysql2.bundle] Error 1

It seems the clang compiler couldn’t find an SSL library on the system. The solution was:

> brew install openssl
> bundle config --global build.mysql2 --with-opt-dir="$(brew --prefix openssl)
> bundle

# This also works:
> export LIBRARY_PATH=$LIBRARY_PATH:/usr/local/opt/openssl/lib/

SquareSpace SEO – fixing default robots tag

I recently used the SquareSpace platform to throw together a quick company demonstration website. However even after weeks, the website wasn’t showing up in Google results.

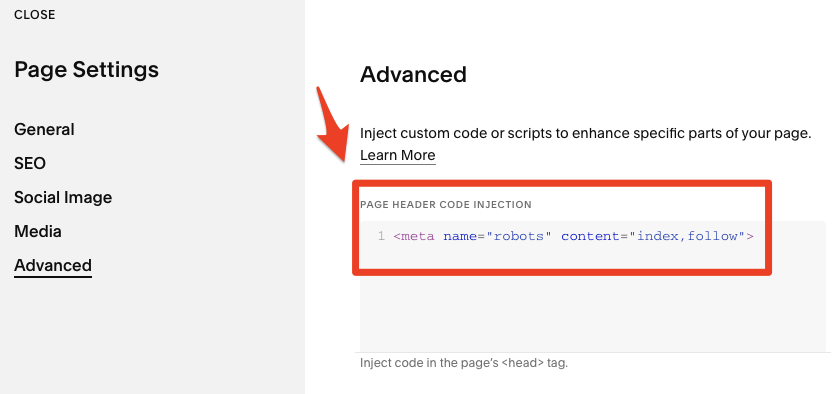
It turns out that, by default, SquareSpace will insert a <meta name="robots" content="noindex,nofollow"> tag into the homepage! What a truly bizarre preset, as it completely nerfs your site’s SEO. Even worse, the tag cannot be configured using the site builder user interface!

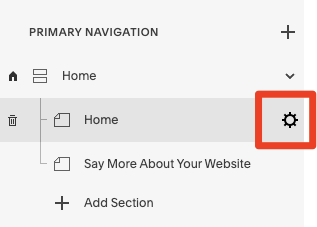
The solution is to edit the page in SquareSpace and use the Advanced -> Code Injection option to manually override the <meta> tag with the correct content of <meta name="robots" content="index,follow"> as shown in the screenshots below.

My site is now indexing correctly and showing in the first SERP page. You can confirm that the tag configration has worked using the SEO Site Checkup NoIndex Tag Test webapp.

Once your homepage has the corrected <meta> tag, use Google’s URL Inspection tool to request a recrawl of the site (as per the Google Developer Docs). You can also submit the SquareSpace sitemap, which by default is set to https://www.yourwebsite.com/sitemap.xml.

Your page should now begin to have increased visiblity in Google within a couple of days.

Screenshots for SquareSpace configration:

Screenshots for Google Search Console configuration:

Search Console URL: https://search.google.com/search-console

Remapping Caps Lock to Control and Escape in macOS Big Sur

For more better text editing and great success.

I’m a big fan of VIM modal editing and keeping keyboard shortcuts as close to the home row as possible. This philosophy allows fluid text editing and staying in the “programming flow state”.

Remapping the Caps Lock key to Control and Escape is a big part of this workflow. Pressing and releasing sends the Escape key, while pressing and holding emulates the Control Key.

In macOS, I’d been using Karabiner Elements to enable this remapping, however with macOS Big Sur I could no longer get the configuration to work. This was a serious annoyance, since the VIM shortcuts are burned into my fingertips.

Enter HammerSpoon! Using the ControlEscape plugin, I am now back in remapping bliss. Below are the System Preference settings required to make this setup work.

Troubleshooting

If you use multiple keyboards with your mac, for example an Apple Magic bluetooth keyboard, the modifier keys are configured individually for each one – so make sure the correct keyboard is chosen in the “Select keyboard” dropdown:

Okta API: Postman – Invalid Session Error

Working with the Okta API, an API key can be used to authenticate calls. One would assume that the API key would be specified in Postman’s “Authorization” tab, but nope.

For some inscrutable reason, when using the standard Authorization API Key method in Postman, the following cryptic error message is excreted:

{ "errorCode": "E0000005", "errorSummary": "Invalid session", "errorLink": "E0000005", "errorId": "oa...BQ", "errorCauses": []}

This error message is… not particularly helpful, and neither the Okta docs nor Googling produces any clues as to the problem cause.

As it turns out, the solution is to set Authorization to "No Auth", and add a Header named Authorization with the value of "SSWS {{apikey}}", where {{apikey}} is the value of an API Token generated using the https://yourorg.okta.com/admin/access/api/tokens page.

So, there you have it, I hope this post saves some poor soul in the future.

Rails 6: Beware the master.key

Checking encrypted credentials into git using Rails 6 feels weird but is pretty great.

What isn’t great is getting this error when deploying to Heroku:

ActiveSupport::MessageEncryptor::InvalidMessage: ActiveSupport::MessageEncryptor::InvalidMessage

After running EDITOR=vim bundle exec rails credentials:edit Rails will create a master.key file which works fine, but expects all your environments to be in a single credentials file and creates a master.key to decrypt the file.

Subsequently running EDITOR=vim bundle exec rails credentials:edit --environment staging appears to not use the master key and instead autocreates a ./config/credentials/staging.key.

In Heroku, the RAILS_MASTER_KEY environment variable needs to be set to the value of staging.key, not master.key, otherwise the MessageEncryptor error is thrown. This wasn’t clear to me from various tutorials and StackOverflow posts.

Git: fix secondary ssh key unable to access repo (MFA code problem)

The Problem

For some reason after enabling MFA on my secondary (work) GitHub account, I occasionally get a “broken” SSH key loaded into ssh-agent, possibly after entering an incorrect MFA code during my .bashrc login process in terminal.

When attempting to interact with a git repo using the secondary SSH key, access is denied.

The error from git is factual but not helpful:

> git pull
ERROR: Repository not found.
fatal: Could not read from remote repository.


Please make sure you have the correct access rights
and the repository exists.

The Fix

A reliable solution is to clear out all SSH keys from ssh-agent and re-add:

> ssh-add -D
> ssh-add -K ~/.ssh/customkeyname-id_rsa

Eventually I’ll troubleshoot the underlying issue but for now this fix is good enough.